When I wanted to set up Coldfusion 2016 with Apache for my local development environment in Windows 10, I was not able find any blog/article that would provide the complete steps needed to set up a Coldfusion instance, to mention in specific - I was not able to find information on the changes to the Apache related files. I had to do a bit of google search to learn few things about Apache and do some trial and error and finally figured out how to set it up!
It is assumed that Apache 2.4 and Coldfusion 2016 has already been installed in the system in which the below tasks will be performed
Points 1 to 3 are changes to apache that will be common to all CF instances
1. Open the c:/Apache24/conf/httpd.conf file
2. At line #279 – comment the existing line of code ‘DirectoryIndex index.html’ and add a new line of code in the line ‘DirectoryIndex /index.cfm’ *note: this change is required to tell apache to look for an index.cfm file if the url doesn’t refer to a file. Example: localdev:8501/
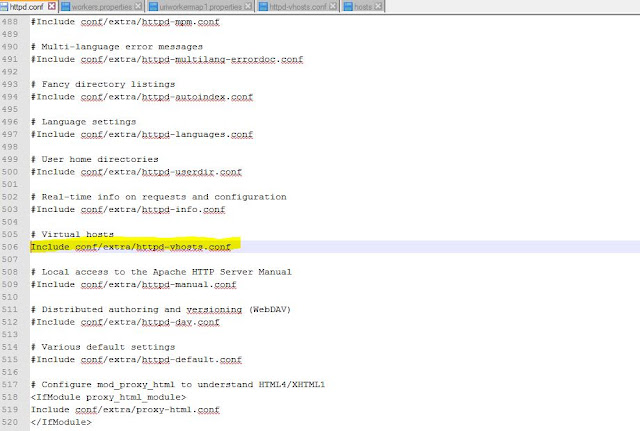
3. At line #505 – uncomment the line ‘Include conf/extra/httpd-vhosts.conf’ *note: this change is done to tell apache to refer to the ‘httpd-vhosts.conf’ file for the virtual hosts
** Restart Apache now to check if it starts.
Point 4 onwards, the changes are specific to each CF instances being created
4. Log in to the ColdFusion 2016 Administrator (http://localhost:8500/CFIDE/administrator)
5. Navigate to Enterprise Manager > Instance Manager
6. Click on Add New Instance
7. Enter ‘server1’ for the Server Name field, and tab to the next field. The Server Directory should automatically update to ‘C:\ColdFusion2016\server1’.
8. Check the Create Windows Service checkbox.
9. Click the Submit button.
A new instance will be created – this will take a few minutes. A new directory will have been created – C:\ColdFusion2016\server1.
10. Add a new worker for the instance in the ‘C:\ColdFusion2016\config\wsconfig\1\ workers.properties’ file. The port number for the instance can be taken from the ‘Instance manager’ screen of the main CF administrator.
worker.server1.host=server1.local.com
worker.server1.port=8012
11. create a copy of the uriworkermap.properties file with the name uriworkermap1.properties for the new instance *note: each CF instance will require a separate uriworkermap.properties file
12. open the uriworkermap1.properties file and replace all occurrences of ‘cfusion’ with the new instance name
The name of the instance here is ‘server1’
13. modify the C:\Apache24\conf\extra\ httpd-vhosts.conf file to add a virtual host entry for the CF instance. The highlighted information for the instance will be specific to that instance.
14. modify the C:\Windows\System32\drivers\etc\hosts file
Add an entry for the CF instance’s sever alias (url)
**Restart your system to start the service for the new Coldfusion instance.
Hit the local instance URL (server1.local.com) in the browser to check if you can access the index.cfm of the local instance.
The issues mentioned below didn’t occur in all machines, but if the new instance is not set up successfully after performing the above-mentioned steps, try the below.
1. In the CF administrator, Click on ‘Settings’ in the left menu
2. Uncheck the box for ‘Enable HTTP status codes’ (This will prevent Apache from displaying the default error instead of Coldfusion errors)


No comments:
Post a Comment